
How to Connect Paperclip to PostDovo for Social Media Automation
Give your Paperclip agents access to PostDovo to plan, write, schedule and publish social media posts.
Add PostDovo through Paperclip’s Connectors page and approve browser sign-in. No manually created access token is needed for this method.
Starter is $0/month and includes AI agents and full automation; Analytics is excluded.
Quick Setup
Open Connectors → Connect your own tool → Connect your own MCP server. Paste the URL below, click Continue, review connection access and choose Check link.
https://app.postdovo.com/mcp
Sign in to PostDovo and click Approve. Back in Paperclip, set the action permissions, then ask an authorized agent to list your connected social accounts.
Before You Start
Paperclip is open-source software for running teams of AI agents. Have your Paperclip installation running and an agent ready to use it. Connect the social accounts you want to manage inside PostDovo first.
This guide follows the supplied workflow from a self-hosted Paperclip installation at localhost:3100. Your installation’s address, labels and layout may differ by version. Use your own Paperclip address when returning from authorization.
Connect PostDovo through Paperclip
Open Connectors and Connect Your Own Tool
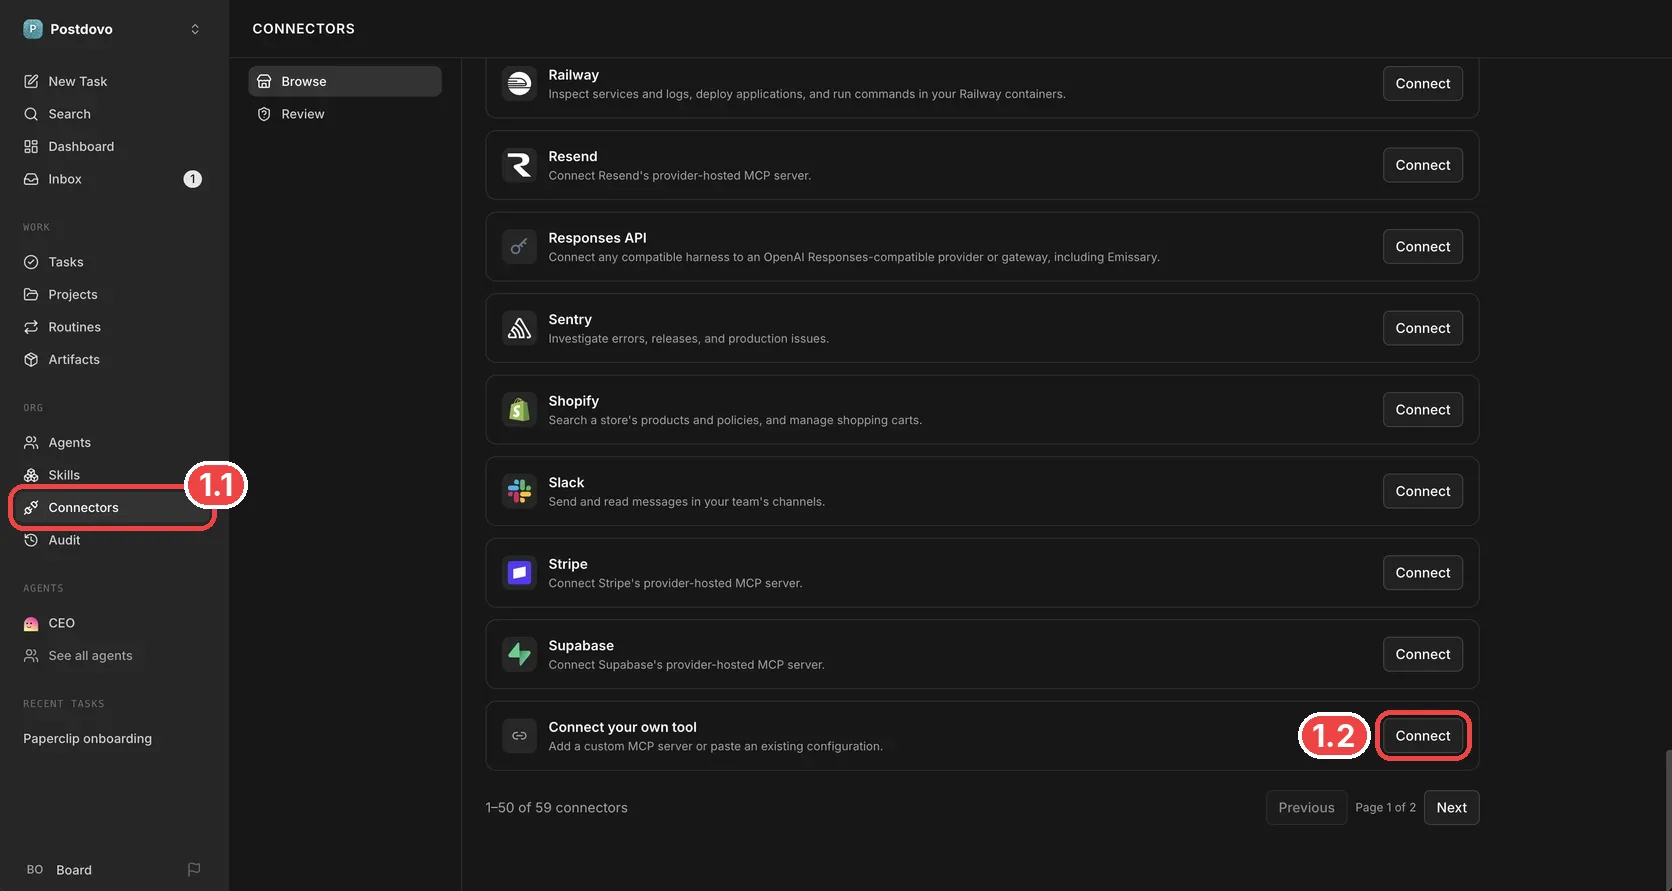
Click Connectors (1.1) in Paperclip’s sidebar. In the Browse list, scroll to the bottom of the first page and click Connect on Connect your own tool (1.2). Its description says you can add a custom MCP server or paste an existing configuration.
Choose Connect Your Own MCP Server
Select Connect your own MCP server (2.1), described as entering a URL for a custom or self-hosted MCP server. The other option, Paste a config, is for an existing configuration snippet.

Enter the PostDovo MCP Address
Paste this address into the URL field (3.1) and click Continue (3.2).
https://app.postdovo.com/mcp
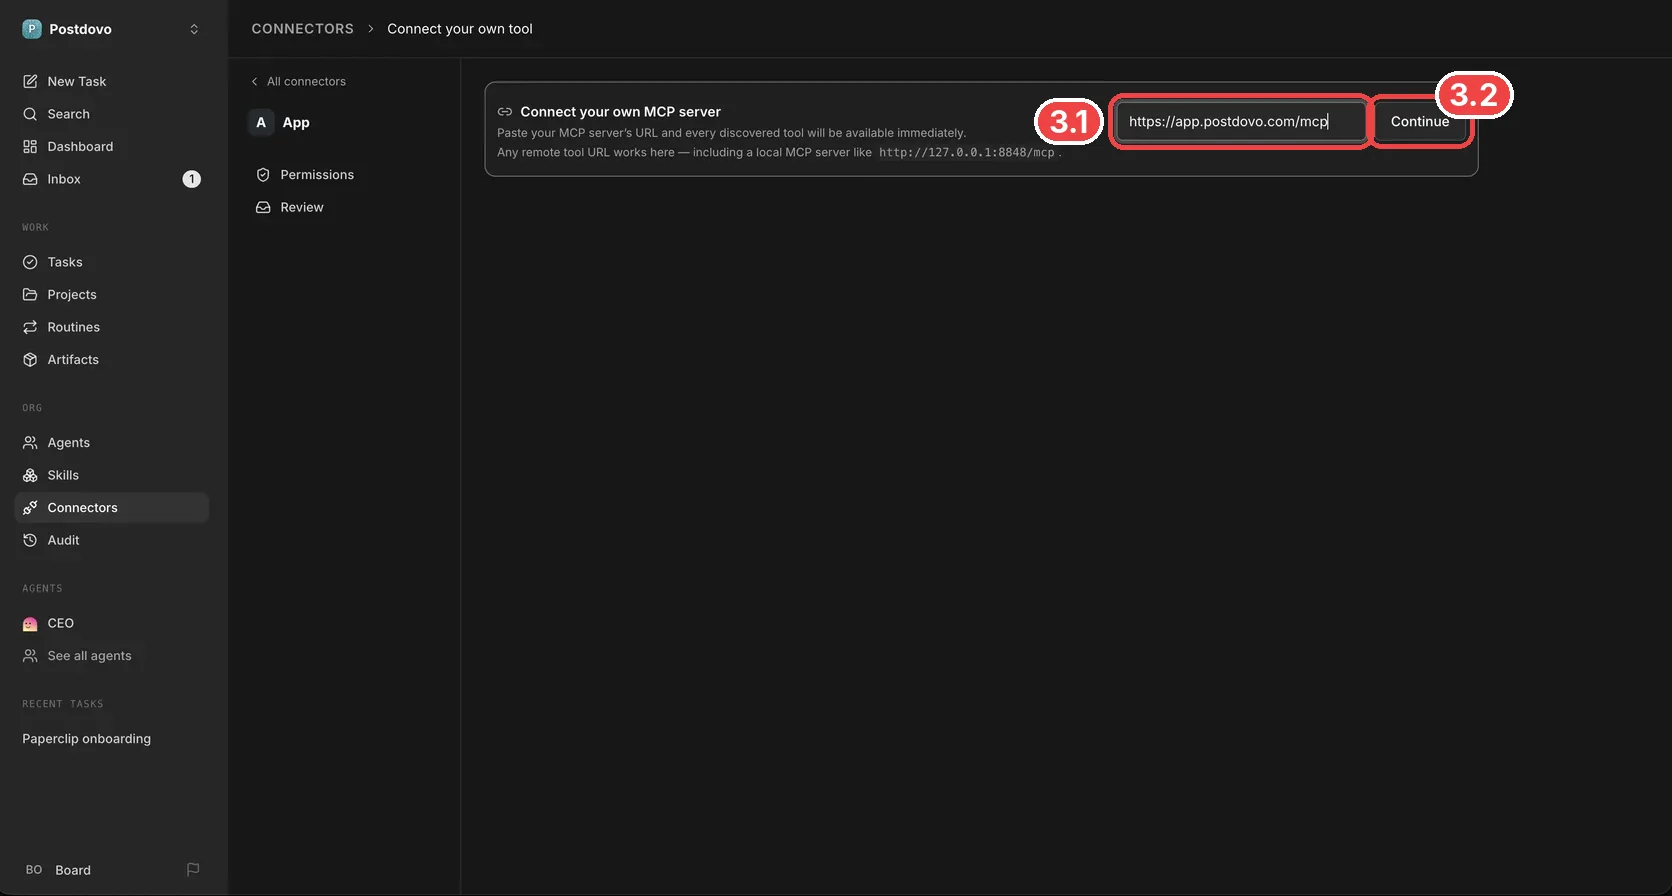
Use the exact address: include https:// and the ending /mcp, with no trailing slash. Paperclip must be able to reach the endpoint over the public internet. PostDovo uses streamable HTTP.
Review Access and Press Check Link
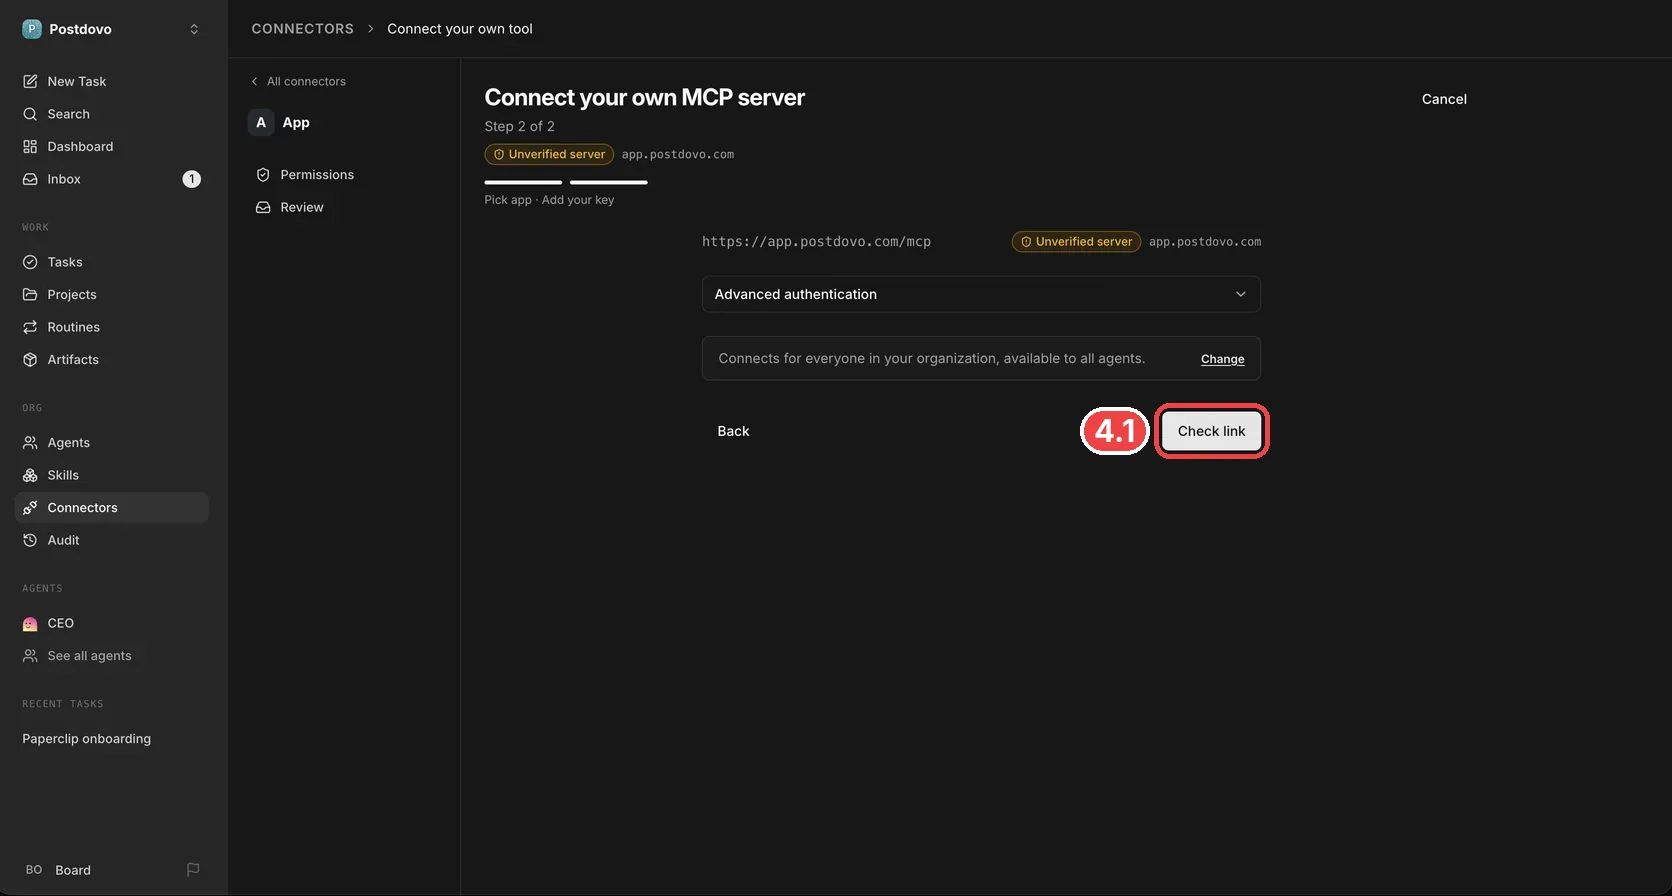
Step 2 of 2 displays the address with an Unverified server label. This means Paperclip has not reviewed the server; it does not mean the connection has failed.
Leave Advanced authentication unchanged for browser sign-in. Review the access line above the button: the supplied workflow makes the connection available throughout the organization and to all agents. Click Change first if you want narrower access.
Click Check link (4.1).
Sign In to PostDovo and Approve
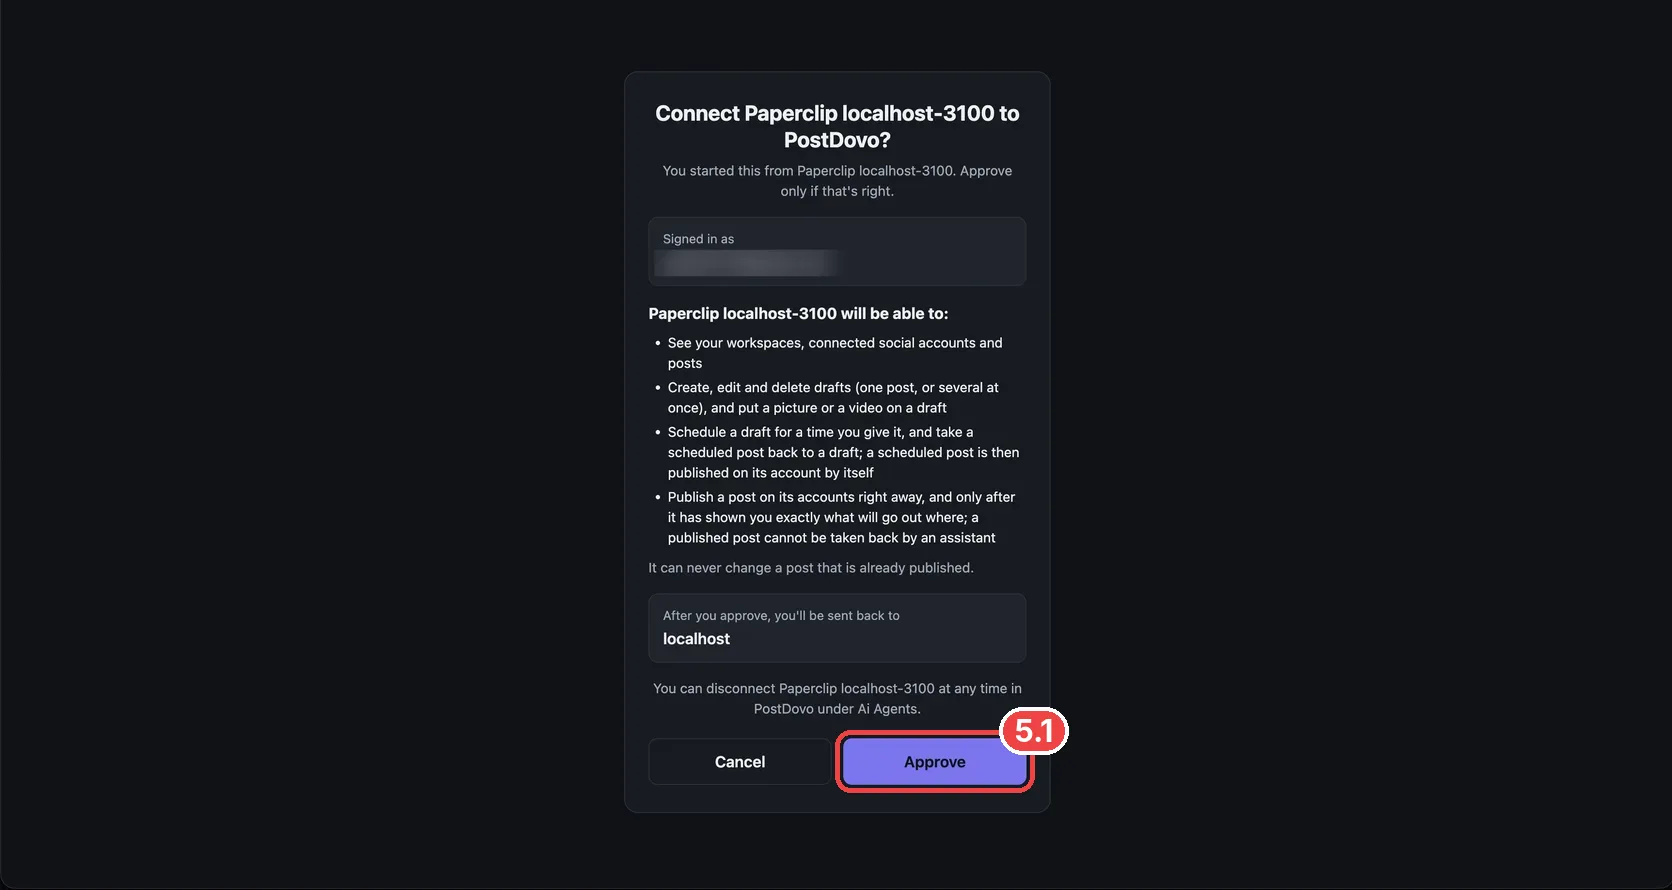
Paperclip registers its OAuth client with PostDovo and opens authorization in your browser. Sign in to PostDovo if asked. Check that the page’s Paperclip name belongs to your installation; the supplied example identifies localhost-3100.
Read the requested access, then click Approve (5.1). You return to your Paperclip installation to finish setup. The approval completes sign-in; choose action permissions next.
Choose What Your Agents May Do
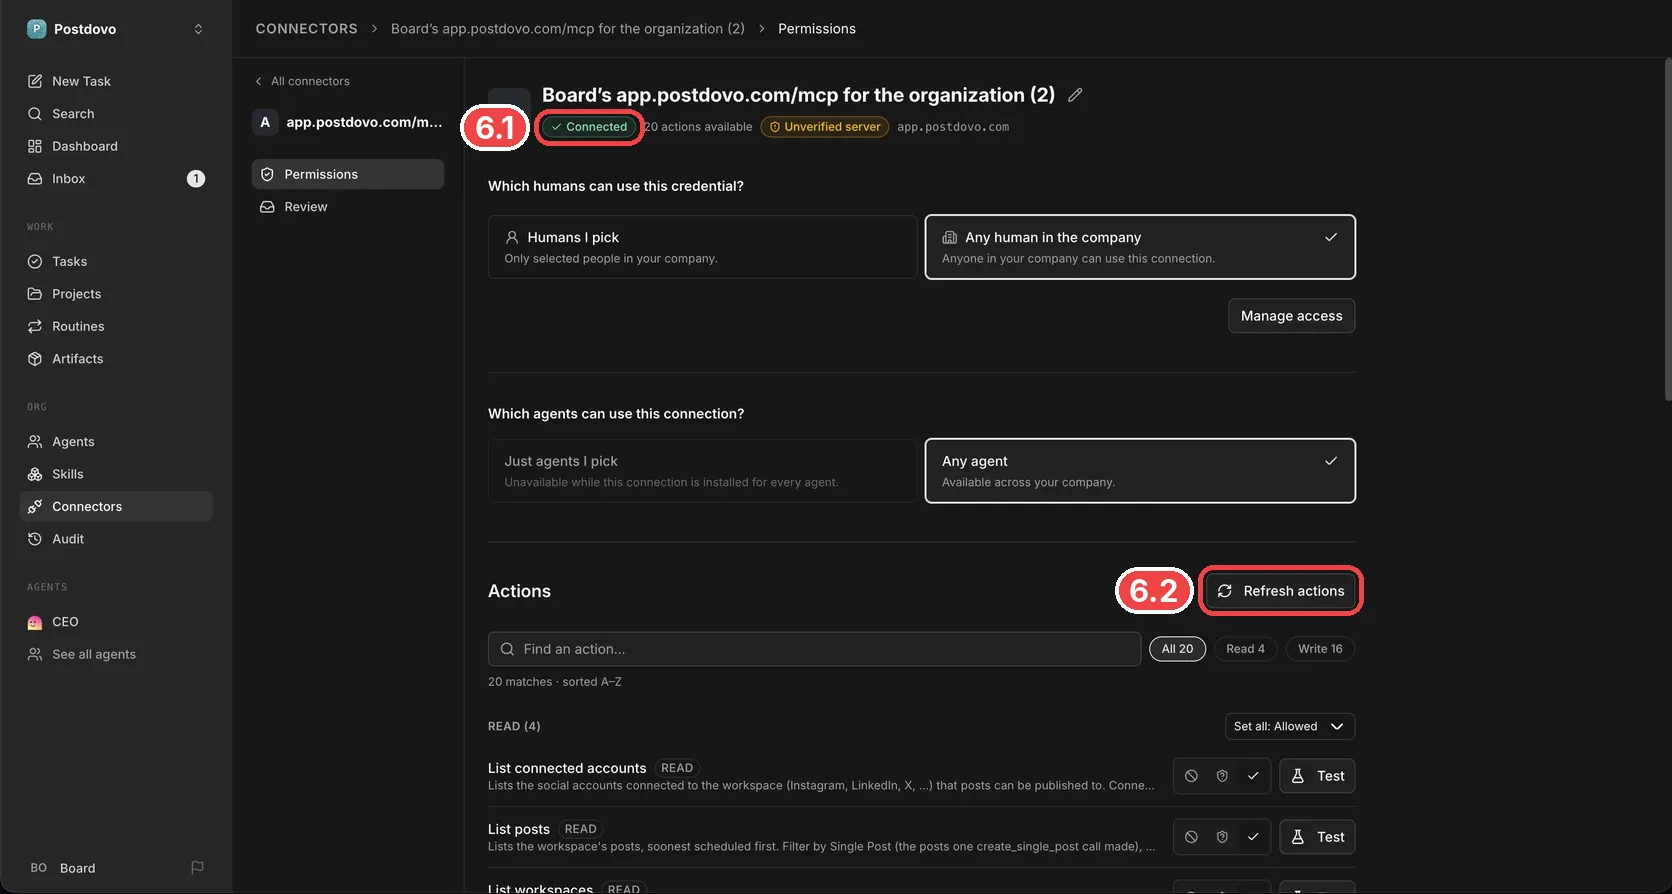
The connection page shows Connected (6.1) and the available action count. The supplied example shows 20 actions; this count can change as PostDovo’s tools evolve.
Review each action’s purpose. Read actions inspect data; Write actions can create, change, schedule or publish posts. Use the controls on each row:
| Setting | Meaning |
|---|---|
| Off — circle with a line | The agent cannot run the action. |
| Ask first — shield | Each call waits for a person’s approval. |
| Allowed — tick | The action can run without per-call approval. |
Allow the Read actions you need. Set publish and delete actions to Ask first if you want to approve each call. Start other Write actions at Off or Ask first, then enable the ones your workflow needs. Review the actual settings rather than assuming new actions start disabled.
Set all changes a whole group. Test beside an action tries it, so review what that action does before testing. Refresh actions (6.2) reloads the server’s tools; review permissions again afterward.
Ask an Agent to Check the Connection
Choose an agent that has access to the connection and give it this request:
Using PostDovo, which social accounts do I have connected?
Confirm that it retrieves your accounts from PostDovo. If the connector is connected but the agent has no tools, check agent access, the active identity and action permissions, then start a new run. A successful account lookup checks the connection without publishing a post.
Alternative: Configure PostDovo in a Claude Code Runtime
The Connectors method above is the primary path. This alternative is for a Claude Code runtime that reads the host user’s MCP configuration.
Check runtime compatibility first: isolated Paperclip Runner sessions normally do not load host CLI entries unless configured with a preconfigured home. Runs using –strict-mcp-config also ignore them. In those cases, use Connectors.
Add the Token-Based Runtime Connection
Create a PostDovo access token. On the machine running the agent, use the same OS user and open the agent’s working folder. Replace YOUR_TOKEN and run:
claude mcp add --transport http --scope user postdovo https://app.postdovo.com/mcp --header "Authorization: Bearer YOUR_TOKEN"
User scope is not limited to one agent. Other Claude Code runs under that OS user can use it. For one-agent isolation, use a dedicated OS user or select that agent explicitly through Connectors.
Check the entry from the same runtime context:
claude mcp list
Look for PostDovo and a successful connection status. Then start a new agent run and test account listing.
Different permission boundary: direct runtime tools are outside Paperclip’s connector gateway. Paperclip’s Allowed, Ask first and Off settings for a connector do not govern this separate runtime connection.
Keep the token private. A literal token in the command can be retained in shell history and runtime configuration. Revoke it in PostDovo when no longer needed. Other runtimes need their own configuration; the command above is specifically for Claude Code.
Watch the Paperclip Setup Tutorial
Try Your First Paperclip Social Media Task
Once the account-list check succeeds, give your agent a draft task:
Using PostDovo, help me create a social media post for my business. Ask for the business details and target accounts, prepare a draft, and show it to me before scheduling or publishing.
Plan a Campaign with Your Agent Team
Give the agent a clear campaign goal and ask it to collect the details before scheduling.
Using PostDovo, plan a seven-day social media campaign. Ask for my business website, campaign goal, target accounts, start date and timezone. Prepare the drafts and media plan for review. Wait for my approval before scheduling.
Review the resulting drafts in PostDovo. Provide exact dates, times and a timezone when scheduling. Keep the relevant Paperclip action permissions aligned with the task you want the agent to perform.
PostDovo Starter Includes Agent Automation
Starter includes up to five connected social accounts in one workspace, unlimited Single Post scheduling and publishing, and AI-agent automation. Analytics is excluded.
PostDovo AI generation uses credits, and X publishing requires credits. Paperclip hosting and AI runtime or provider costs apply separately.
For a single agent outside Paperclip, the Claude Code setup works the same way.
Troubleshooting and FAQs
Do I need a token for the Connectors method?
No. Add the MCP URL and complete browser authorization. The token is for the separate Claude Code runtime alternative.
Does Unverified server mean PostDovo cannot connect?
No. It means the custom server has not been reviewed for Paperclip’s catalog. Check the Connected status and run the account-list request to verify access.
Why can one agent not see PostDovo?
Check the connection’s people and agent access, active identity and action permissions. Start a new run after setup and check its logs if access is still missing.
Why is an agent waiting rather than publishing?
If the action is set to Ask first, approve or decline its request in Paperclip’s review flow. Off blocks the action; Allowed permits it without a per-call review.
Should I refresh actions?
Refresh when PostDovo’s tool list changes. Review the resulting list and permissions; do not assume newly discovered actions are disabled or require approval.
Why does the runtime command work locally but not inside Paperclip?
The agent may use an isolated Runner home or strict MCP configuration. Those runs can ignore host Claude Code entries. Configure PostDovo through Connectors instead.
Can Paperclip agents schedule images and videos?
Yes, when the agent has the required PostDovo tools and permissions and the media meets the destination platform’s requirements. Review the post before scheduling.
How do I disconnect Paperclip?
Disconnect the PostDovo connection in Paperclip or revoke the Paperclip authorization in PostDovo’s AI Agents settings. If you added a separate runtime token connection, remove that runtime entry and revoke its token too.
Connect Your Paperclip Agents to PostDovo
Add PostDovo, approve access and choose which agents and actions to allow. Start with an account check, then prepare your first draft.